INTERNATIONAL DIPLOMA IN COMPUTING/
BUSINESS MANAGEMENT
Assignment
|
TASK 02
|
Allocated Marks
|
Given Marks
|
|
|
2.1
|
What is a word processor? Name
some popular word processors?
|
15
|
|
|
2.2
|
Discuss the various display
views available in Word
|
20
|
|
|
2.3
|
What are the steps to save the
document with protection?
|
20
|
|
|
2.4
|
What are the basic steps for
printing a document? Also explain how to protect documents
|
25
|
|
|
2.5
|
How to insert the document creation,
last printed, last saved date and time?
|
20
|
|
|
Total
|
100
|
|
|
|
TASK 03
|
Allocated Marks
|
Given Marks
|
|
|
3.1
|
Explain the use of Mail merge
|
35
|
|
|
3.2
|
How to create Mail merge to sent
invitation for 10 persons with merge fields are Title, Initial, Name,
Organization, Street Name and City ?
Write down the steps clearly.
|
65
|
|
|
Total
|
100
|
|
|
|
TASK 04
|
Allocated Marks
|
Given Marks
|
|
|
4.1
|
List out the features and the things you can do using PowerPoint?
|
20
|
|
|
4.2
|
What are the
advantages of PowerPoint over the other presentation methods?
|
20
|
|
|
4.3
|
What
is Transitions and how do you add transitions to a slide show?
|
10
|
|
|
4.4
|
What is the difference between
Animation and Transition? Which view can be used to insert and test the:
1. Animation effects and
2. Transition effects
|
30
|
|
|
4.5
|
Name any two view options
available in PowerPoint. Discuss the given options
|
20
|
|
|
Total
|
100
|
|
|
|
TASK 05
|
Allocated Marks
|
Given Marks
|
|
|
5.1
|
What is Microsoft Access and give Some examples of commonly used
databases
|
10
|
|
|
5.2
|
Briefly explain the difference
between Manual File System & Database Management System
|
20
|
|
|
5.3
|
Explain the main objects of
Access Database.
|
15
|
|
|
5.4
|
Explain the importance of create
relationship between tables
|
15
|
|
|
5.5
|
Assume that
you are creating a database table to hold the information of the Items in the
Super market. Write down the dada type suitable to hold the following
information:
a) Item Number
b) Item Description
c) Unit Price
d) Stock Balance
e) Reorder Level
f)
Store Location
|
30
|
|
|
5.6
|
Name
a suitable field as the primary key in the above table and explain why you
selected this field for the primary key
|
10
|
|
|
Total
|
100
|
|
|
|
TASK 06
|
Allocated Marks
|
Given Marks
|
|
|
6.1
|
How do you add a
new e-mail account in MS Outlook 2007
|
20
|
|
|
6.2
|
What are the configuration
required for Outlook to manage multiple e-mail accounts
|
20
|
|
|
6.3
|
Write
down the steps to search particular subject in email.
|
20
|
|
|
6.4
|
Write down the
steps to add new fields to view
|
20
|
|
|
6.5
|
How do you create a New Contact and add in group’s list
|
20
|
|
|
Total
|
100
|
|
|
|
TASK 07
|
Allocated
Marks
|
Given Marks
|
|
|
7.1
|
Explain
what is user interface design and the summary of principles for user
interface design
|
25
|
|
|
7.2
|
What is the
use of sitemap of the web site?
|
35
|
|
|
7.3
|
Use
a template to create a webpage using tables to organize the Title, Links, and
Context
|
40
|
|
|
Total
|
100
|
|
|
|
TASK 08
|
Allocated
Marks
|
Given Marks
|
|
|
8.1
|
Create a page with a 1 row, 3 column table to hold
three pictures of graphics
|
30
|
|
|
8.2
|
List down & briefly explain about some
creative things that can be included in web sites
|
25
|
|
|
8.3
|
List down &
briefly explain what things that has to be avoided when designing web pages
|
25
|
|
|
8.4
|
There are many things that need to be taken into
account before you begin to create html documents. List some of those with
brief introductions.
|
20
|
|
|
Total
|
100
|
|
|
TASK01
T01.1
T01.5
Create formulas to display a VAT
Amount for each Item Name by using
formula
Vat
Amount = Totl Amount * Vat%
Ex :-
E13 * 15%
T01.6 Create formulas
to display a Gross Amount for each Item.
Gross Amount = Total Amout *Vat%
EX :- E12 * F12
T01.7
Create formulas to display a Discount
Amount for each Item.
Discount = Quantity
* Discount price
Ex :- (Key board) D12*
B6
(mouse)
D13*C 6
( Pen drive) D14 *D6
T01.8 Create formulas to display
a Net Amount for each Item.
Net
Amount = Gross Amount *Discount price
EX:- G12 *H12
T01.9
Create formulas to display a Total of
Columns Quantity, Total Amount, VAT Amount, Gross Amount, Discount Amount and
Net Amount
=SUM (E12 :E21)
Ex:-
e12+e13+e14+e15+e16+e17+e18+e19+e20
T01.10
Extract all the Items which a item ‘Keyboard’.
|
Sale the Report For the month of March
|
|||||||||||||||||
|
Item Name
|
|||||||||||||||||
|
Keyboard
|
Mouse
|
Pendrive
|
|||||||||||||||
|
Discount A
|
100
|
150
|
200
|
||||||||||||||
|
Vat 15%
|
|||||||||||||||||
|
Costomer code
|
Item Name
|
Unit Price
|
Quantity
|
Total Amount
|
Vat Amount
|
Groos Amount
|
Discount Amount
|
Net Amount
|
|||||||||
|
A1001
|
Keyboard
|
250
|
35
|
$8,750.00
|
$1,312.50
|
|
|
|
|||||||||
|
A1002
|
Mouse
|
250
|
12
|
$3,000.00
|
$450.00
|
|
|
|
|||||||||
|
A1003
|
Pendrive
|
500
|
8
|
$4,000.00
|
$600.00
|
|
|
|
|||||||||
|
A1004
|
Keyboard
|
1000
|
15
|
$15,000.00
|
$2,250.00
|
|
|
|
|||||||||
|
A1005
|
Mouse
|
250
|
15
|
$3,750.00
|
$562.50
|
|
|
|
|||||||||
|
A1006
|
Pendrive
|
1000
|
30
|
$30,000.00
|
$4,500.00
|
|
|
|
|||||||||
|
A1007
|
Pendrive
|
1000
|
10
|
$10,000.00
|
$1,500.00
|
|
|
|
|||||||||
|
A1008
|
Keyboard
|
250
|
25
|
$6,250.00
|
$937.50
|
|
|
|
|||||||||
|
A1009
|
Mouse
|
250
|
50
|
$12,500.00
|
$1,875.00
|
|
|
|
|||||||||
|
|
|
|
|
|
|
|
|
|
|||||||||
|
Total
|
|
|
200
|
$93,250.00
|
$13,987.50
|
|
|
|
|||||||||
|
Sale the Report For the month of March
|
|||||||||||||||||
|
Item Name
|
|||||||||||||||||
|
Keyboard
|
Mouse
|
Pendrive
|
|||||||||||||||
|
Discount A
|
100
|
150
|
200
|
||||||||||||||
|
Vat 15%
|
|||||||||||||||||
|
Costomer code
|
Item Name
|
Unit Price
|
Quantity
|
Total Amount
|
Vat Amount
|
Groos Amount
|
Discount Amount
|
Net Amount
|
|||||||||
|
A1001
|
Keyboard
|
250
|
35
|
$8,750.00
|
$1,312.50
|
$10,062.50
|
|
|
|||||||||
|
A1002
|
Mouse
|
250
|
12
|
$3,000.00
|
$450.00
|
$3,450.00
|
|
|
|||||||||
|
A1003
|
Pendrive
|
500
|
8
|
$4,000.00
|
$600.00
|
$4,600.00
|
|
|
|||||||||
|
A1004
|
Keyboard
|
1000
|
15
|
$15,000.00
|
$2,250.00
|
$17,250.00
|
|
|
|||||||||
|
A1005
|
Mouse
|
250
|
15
|
$3,750.00
|
$562.50
|
$4,312.50
|
|
|
|||||||||
|
A1006
|
Pendrive
|
1000
|
30
|
$30,000.00
|
$4,500.00
|
$34,500.00
|
|
|
|||||||||
|
A1007
|
Pendrive
|
1000
|
10
|
$10,000.00
|
$1,500.00
|
$11,500.00
|
|
|
|||||||||
|
A1008
|
Keyboard
|
250
|
25
|
$6,250.00
|
$937.50
|
$7,187.50
|
|
|
|||||||||
|
A1009
|
Mouse
|
250
|
50
|
$12,500.00
|
$1,875.00
|
$14,375.00
|
|
|
|||||||||
|
|
|
|
|
|
|
|
|
|
|||||||||
|
Total
|
|
|
200
|
$93,250.00
|
$13,987.50
|
$107,237.50
|
|
|
|||||||||
|
Sale the Report For the month of March
|
|||||||||
|
Item Name
|
|||||||||
|
Keyboard
|
Mouse
|
Pendrive
|
|||||||
|
Discount A
|
100
|
150
|
200
|
||||||
|
Vat 15%
|
|||||||||
|
Costomer code
|
Item Name
|
Unit Price
|
Quantity
|
Total Amount
|
Vat Amount
|
Groos Amount
|
Discount Amount
|
Net Amount
|
|
|
A1001
|
Keyboard
|
250
|
35
|
$8,750.00
|
$1,312.50
|
$10,062.50
|
$3,500.00
|
|
|
|
A1002
|
Mouse
|
250
|
12
|
$3,000.00
|
$450.00
|
$3,450.00
|
$1,800.00
|
|
|
|
A1003
|
Pendrive
|
500
|
8
|
$4,000.00
|
$600.00
|
$4,600.00
|
$1,600.00
|
|
|
|
A1004
|
Keyboard
|
1000
|
15
|
$15,000.00
|
$2,250.00
|
$17,250.00
|
$1,500.00
|
|
|
|
A1005
|
Mouse
|
250
|
15
|
$3,750.00
|
$562.50
|
$4,312.50
|
$2,250.00
|
|
|
|
A1006
|
Pendrive
|
1000
|
30
|
$30,000.00
|
$4,500.00
|
$34,500.00
|
$6,000.00
|
|
|
|
A1007
|
Pendrive
|
1000
|
10
|
$10,000.00
|
$1,500.00
|
$11,500.00
|
$2,000.00
|
|
|
|
A1008
|
Keyboard
|
250
|
25
|
$6,250.00
|
$937.50
|
$7,187.50
|
$2,500.00
|
|
|
|
A1009
|
Mouse
|
250
|
50
|
$12,500.00
|
$1,875.00
|
$14,375.00
|
$7,500.00
|
|
|
|
|
|
|
|
|
|
|
|
|
|
|
Total
|
|
|
200
|
$93,250.00
|
$13,987.50
|
$107,237.50
|
$28,650.00
|
|
|
Pen drav
ive
keyboard
Mouse
TASK02
T2.1 What is a word
processor? Name some popular word processors?
A word processor is an electronic device
or computer software application that, as directed by the user, performs word
processing: the composition, editing, formatting and sometimes printing of any
sort of written material.
v Microsoft office word
v Microsoft office one note
v Acrobat.com
v Foxit reader
v Open office.org
v Word pad
v Not pad
|
T2.2 Discuss the
various display views available in Word
Print Layout View
Print Layout view is the common
view in Word. This view shows the document as it would appear on paper after printing.
Elements such as color, font, header, footer, columns and breaks appear in
this view. When closing other views, this is the view the document will
return to.
Full Screen Reading View
The Full Screen Reading view is
designed for reading the document. It may not allow for typing or general
editing of the document unless you change options in the "View
Options" drop-down menu. Full-screen view will allow actions that are
similar to actions that are carried out when reading a textbook such as
highlighting words, adding comments, finding words or phrases and temporarily
making the words larger for easier reading.
Web Layout View
The Web Layout view is a view of
the document as it would appear if published directly to the web. "Dead
space" around the document page is removed. Elements such as the left
margin ruler, headers, footers, and watermark do not show in this view.
Outline
View
To view sections of the document
with bullet points, Outline View is the best selection. Most document
elements disappear temporarily while this view is active and each paragraph
is positioned behind a bullet point. Document comment numbers appear, but not
the comment itself. Highlighting also appears in this view. Levels of bullet
points can be moved up and down, formatted and searched upon easily.
Draft View
Draft
view also hides most document elements. This is for quick and easy edits of
wording without the distraction of background colors, borders, headers or
footers. The left ruler bar disappears, but the top will remain. Highlighting
will show in this view.
Print
Preview
Print Preview allows you to see
what your document pages as they would appear on a printed page, which is
frequently useful when you're laying out resumes, letters or manuscripts.
|
T2.3 What are the steps
to save the document with protection?
You
can use document protection to restrict the types of changes reviewers can make
to your document.
Steps are,
Click the Word menu. This is located
in the top-left corner, between the Apple menu and the File menu. Select
Preferences.
Click Security.
This can be found under the Personal Settings section. This will open the
Security window.
Create your password. In the “Password to open” field,
type in your password and then click OK. You will be asked to reenter your
password to confirm it. You will not be able to retrieve this password if you
forget it, so write it down in a safe location.
In order for the password
to take effect, you must save the file.
Remove your password.
If you want to remove your password, open the document and click the Word menu
again. Select Preferences and then click Security. There will be a password in the
box, delete it and press OK.
T2.4 What are the
basic steps for printing a document? Also explain how to protect documents
In
the previous lessons, we became familiar with the new interface of MicrosoftWord
2007. We also learned how to create, open and save document
and the options involved. Today we are going to discuss about printing. It’s
really simple to configure printing options in Microsoft Word 2007. We can print an open
document by going to office button –> Print. There are three options in Print
Menu.
1-
Print – If you select
the first option,
which is print, it will give you the print dialog where you can configure
different options. We will see that in detail later.
2-
Quick Print – If you
select quick print, it will just use the default settings and will print the
document directly. It will not ask you of any configuration settings. So if you
have configured your printing settings, then you can easily print using Quick
Print option as it will be faster.
3-
Print Preview – Print preview will give you
the
view of how the document will look like after it has been printed on the paper.
So by previewing your document, you can make sure everything is according to what you’re expecting.
In
print preview,
you can change the margins and orientation of
the page to be printed. And you can select the paper being used for printing
i.e. whether you’re using A4 size paper or a letter or an envelope etc.
Printing Settings
1:
You
can change the print settings by going to office
button –> Word Options –> Advanced.
In advanced, find the Print heading.
Print Settings 2:
Now
we come back to our first point i.e, the print. So we want to print a document
and we want to configure some printer settings. We can do this by going to office button –> Print
–> Print. This will show you a dialog box which has got lots of
options.
From
this dialog, we can select the printer from which we want to print the
document, which pages we want to print (whether some pages or all of ‘em). We
can also specify what we want to print, whether the document itself or we can
also print the document properties.
Shortcut: The shortcut for bringing the Print
Settings is Ctrl – P.
T2.5 How to
insert the document creation, last printed, last saved date and time?
When
you have a document up on your network that several users have access to, it is
nice to know the time and date it is modified. For instance if there is
an interoffice group project, team leaders can keep track of when a document is
created, printed, or last saved.
In the
document place the cursor where you want the date and time to be
inserted. Then choose the Insert tab and click on Quick Parts Field.
When
the Field box opens select Date and Time from the Categories drop down box.
Next,
select which field name you want to appear in the document.
Finally
we want to choose the format for the date and/or time. This is done under
Field Properties.
In the
example below I placed the fields at the end of the document. So I needed
to go through the above process twice. Once for the Print Date and a
second time for the Save Date. The fields now will update automatically
every time a person prints the document or Saves it.
TASK3
3.1
Explain the use of Mail merge
Introduction
Mail
Merge is a useful tool that will allow you to easily produce multiple letters,
labels, envelopes, and more using information stored in a list, database, or
spreadsheet. In this lesson, you will learn how to use the Mail
Merge Wizard to
create a data source and a form letter,
and explore other wizard features. Additionally, you will learn how to use the
Ribbon commands to access mail merge tools outside of the wizard.
Mail Merge
To use Mail Merge:
·
Select
the Mailings on the Ribbon.
·
Select
the Start Mail Merge command.
·
Select Step
by Step Mail Merge Wizard.
The Mail Merge task pane
appears and will guide you through the six main steps to complete a mail merge. You will
have many decisions to make during the process. The following is an example of
how to create a form letter and merge the letter with a data list.
Steps 1-3
·
Choose
the type of document you wish to create. In this example, select Letters.
·
Click Next:Starting
document to move
to Step 2.
·
Select Use
the current document.
·
Click Next:Select
recipients to
move to Step 3.
·
Select
the Type a new list button.
·
Click Create to create a data source. The New
Address List dialog
box appears.
o Click Customize in the dialog box. The Customize
Address List dialog box appears.
o Select any field you do
not need, and click Delete.
o Click Yes to confirm that you wish to delete the
field.
o Continue to delete any
unnecessary fields.
o Click Add.
The Add Field dialog box appears.
o Enter the new field
name.
o Click OK.
o Continue to add any
fields necessary.
o Click OK to close the Customize Address List
dialog box.
To customize the new address list:
o Enter the necessary data
in the New Address List dialog box.
o Click New
Entry to enter
another record.
o Click Close when you have entered all of your data
records.
o Enter the file name you
wish to save the data list as.
o Choose the location
where you wish to save the file.
o Click Save.
The Mail Merge Recipients dialog box appears and displays all of the data
records in the list.
o Confirm the data list is
correct, and click OK.
o Click Next:Write
your letter to
move to Step 4.
Steps 4-6
·
Write
a letter in the current Word document, or use an open existing document.
To
insert recipient data from the list:
o Place the insertion
point in the document where you wish the information to appear.
o Select Address block,
Greeting line, or Electronic postage from the task pane. A dialog box with
options will appear based on your selection.
OR
o Select More Items. The
Insert Merge Field dialog box will appear.
o Select the field you
would like to insert in the document.
o Click Insert.
Notice that a placeholder appears where information from the data record will
eventually appear.
o Repeat these steps each
time you need to enter information from your data record.
·
Click Next:
Preview your letters in
the task pane once you have completed your letter.
·
Preview
the letters to make sure the information from the data record appears correctly
in the letter.
·
Click Next:
Complete the merge.
·
Click Print to print the letters.
·
Click All.
·
Click OK in the Merge to Printer dialog box.
·
Click OK to send the letters to the printer.
The Mail Merge Wizard
allows you to complete the mail merge process in a variety of ways. The best way to learn how to use the different
functions in Mail Merge is to try to develop several of the different
documents—letters, labels, and envelopes—using the different types of data
sources.
T3.3 How to create Mail merge to sent
invitation for 10 persons with merge fields are Title, Initial, Name,
Organization, Street Name and City ?
Write
down the steps clearly.
First type the
invitation in the word.
Then select Mailings tab, then select Start Mail Merge and select Step by Step Mail Merge Wizard
Then a Mail Merge Side Bar will open, select letters and click Next: Starting Document
Then select use the current document and click Next.
Then select Type a new list and select create. Then customize the columns and fill the columns and click OK
Then you will ask to
save that address list. Save the address list by giving a name.
Then select Use an existing list, then click Edit recipient list…
Then select the 10
persons and select OK. Click Next.
Then write your letter
and click Next.
Then Preview your
letters and click Next
Then complete the Merge by
Printing or editing individual letters.
TASK04
T4.1 List out the features and the things you can do using
PowerPoint?
*.Picture
effects
*.Text effects
*.Shape styles
and shape effects
*.Can save as
PDF and XPS
*.Better tables
*.Selection and
visibility task pane
*.Custom slide
layouts-Can add our own place holders
*.Create layouts
from them and save and distribute these within templates and themes.
*.Interface-The
interface has been entirely revamped for Power Point
*.Office
Themes-Probably, the most powerful new feature in power point, office theme
*.work in Word
and Excel as well.
*.make photo
albums.
*.preview the
presentation.
*. clip arts, charts, tables etc.
*.movies, pictures and sound effects.
T4.2 What are the advantages of PowerPoint over the other
presentation methods?
PowerPoint
is good ways to effectively get across short bullet points of information.
They're good base points for a presentation to remind you of what you need to
say. They look good visually; can be easily read if you have a big enough
projectors and you only need one of them. If you used leaflets in a
presentation you'd be wasting paper and ink, power points, although they use
electricity are more of an environmentally friendly way of presenting things.
Also, they're useful because you can add sound and videos to them which will
captivate the viewer’s attention. Plus, they're quick to make and you have as
much information on them as you want because you can add lots of slides.
They're convenient and easy to transport because you can put them onto a memory
stick and then onto your chosen computer.
- Using
PowerPoint over the other presentation methods it is very easy to use.
- In
PowerPoint we can add graphics, text, images, audio, video and animation
with just a few clicks and keystrokes.
- We
can edit the information on the finished slides also.
- It
saves the time.
- It
has the ability to create a handout version of your PowerPoint
presentation.
- PowerPoint
presentations can be shared with anyone from via e-mail.
- It
doesn’t need chalks, backboards or anything to present the presentation.
- Not
like paperwork, presentation can be stored for a long period of time.
- Can easily
input images.
- Templates
are built in for different appearances.
- Can add
notes pages.
- Can easily
add media and recoding.
- More
exciting than the simple word or handwritten presentation.
- Low Cost.
T4.3 What is Transitions
and how do you add transitions to a slide show?
|
1 step –
Select Transitions tab
|
|
2 step –
Select a transition that you
want
|
1.4
What is the
difference between Animation and Transition? Which view can be used to insert
and test
1. Animation
effects and
2. Transition effects
Transition are the
animation effect that are applied to whole slide where as animation
Effects are applied to objects on a slide. For a slide you can have only
one transition effect
While each object on the slide can have multiple animation effects.
Transition effects
appear in Power point slide show view when slides change form one
To the next Like animation effects we can control the speed of each
slide transition effaced
we can also add music or sound.
T4.4 What is the
difference between Animation and Transition? Which view can be used to insert
and test the:
1. Animation effects and
2. Transition effects
1)
Animation
effects allows you to put slide elements, such as text, graphics, pictures.
They are use within a slide. They are used to Entrance, Emphasis and Exit the
text or graphics. Some examples are Fading, Fly In, Float in etc.
2) Transition
effects are occur between each slide. Some of such effects are Wipe, Flash, Dissolve, Split, Revolve etc.
A.Normal view can be used to insert and
test the Animation effects.
B.Slide Sorter view can be used to insert
and test the Transition effects.
T4.5 Name any
two view options available in PowerPoint. Discuss the given options
Slide
Sorter view displays thumbnail sized representations of all slides in your
presentation. This works best when you have to select multiple slides before
you apply a transition or automatic timing to the slide. This view also allows
you to quickly reorder, delete, or duplicate your slides. In addition, this
view displays hidden slides.
A transition effect is a
special effect used to introduce a slide during a slide show. For example, you
can play a sound when the slide appears, or you can make the slide fade in from
black. Apply a transition effect to a single slide to add emphasis, or add the
transition to every slide. For example, in a self-running presentation that
people click through themselves, using the same transition effect on every
slide gives your presentation a polished look.
Here is an example of the Cover
Down transition effect:
To set transition effects for a single slide or for all
slides in a presentation
- On the Slide Show menu, click Slide Transition.
- In the Effect box, click the transition you
want.
- To apply
the transition to the selected slide, click Apply.
·
To apply the transition to all the slides, click Apply All.
Normal View
It allows you to view your slides in different ways which makes it
easier to arrange the
Slides.
Slide Sorter
In the slide sorter view you will be able to see all the slides you have
made for that
PowerPoint and have to ability to move them around.
TASK05
T5.1 What is Microsoft Access and give Some examples of
commonly used databases
Microsoft Access has
been around for some time, yet people often still ask me what is Microsoft
Access and what does it do? Microsoft Access is a part of the Microsoft Office
Suite. It does not come with all versions of Microsoft Office, so if you
specifically want Microsoft Access make sure the office suite you are
purchasing has it.
Microsoft
Access has the look and feel of other Microsoft Office products, including its
layout and navigational aspects. That is where the similarity ends. Microsoft®
Access is a database and, more specifically, a relational database. This will
be explained in more detail later.
Access has
an .mdb extension by default, whereas Microsoft® Word has the .doc extension.
Although this has changed in Access 2007 where the extension is now an accdb
extension. Early versions of Access cannot read accdb extensions but Microsoft
Access 2007 can read and change earlier versions of Access. The above is a
bried overview of what is MicrosoftAccess. Now lets look at it in a bit
more detail.
What is Microsoft Access made up of?
The Microsoft Access Database is
made up of 7 major components:
·
Tables;
·
Relationships;
·
Queries;
·
Forms;
·
Reports;
·
Macros;
·
Modules.
The following gives a quick overview
of each component.
Tables
The tables are the backbone and the
storage container of the data entered into the database. If the tables are not
set up correctly, with the correct relationships, then the database may be
slow, give you the wrong results or not react the way you expect. So, take a
bit of time when setting up your tables.
Queries, forms, etc. are usually
based on a table.
The tables that contain data look a
bit like a table in Spreadsheet, when opened. They have columns and rows as
does a table inExcel worksheet. Each of the columns will have a field name at
the top and each of the rows will represent a record.
As an example:
Relationships
Relationships are the bonds you
build between the tables. They join tables that have associated elements. To do
this there is a field in each table, which is linked to each other, and have
the same values.
Queries
Are the means of manipulating the
data to display in a form or a report. Queries can sort, calculate, group,
filter, join tables, update data, delete data, etc. Their power is immense. The
Microsoft® Access database query language is SQL . The need to know SQL is not
required in the early stages of learning Access. Microsoft® Access writes the
SQL for you, after you tell it what you want, in the Design view of the queries
window.
Forms
Forms are the primary interface
through which the users of the database enter data. The person who enters the
data will interact with forms regularly. The programmer can set the forms to
show only the data required. By using queries, properties, macros and VBA
(Visual Basic for Applications), the ability to add, edit and delete data can
also be set. Forms can be set up and developed to reflect the use they will be
required for.
Reports
Reports are the results of the
manipulation of the data you have entered into the database. Unlike forms, they
cannot be edited. Reports are intended to be used to output data to another
device or application, i.e. printer, fax, Microsoft® Word or Microsoft® Excel.
Macros
Macros are an automatic way for
Access to carry out a series of actions for the database. Access gives you a
selection of actions that are carried out in the order you enter. Macros can
open forms; run queries, change values of a field, run other Macros, etc. the
list is almost endless.
Modules
Modules are the basis of the
programming language that supports Microsoft® Access, The module window is
where you can write and store Visual Basic for Applications (VBA). Advanced
users of Microsoft® Access tend to use VBA instead of Macros. If you would like
to learn VBA, I have a simple step by step lessons.
T5.2 Briefly explain the difference
between Manual File System & Database Management System.
File System
1. Files act locally where as DBMS
saves directly in a database
2. Saves in temporary locations
where as DBMS in well arranged and permanent data base locations
3. In File Sys., transactions are
not possible where as various transactions like insert,delete,view,updating etc
r possible in DBMS
4. Data will be accessed through
single or various files where as in DBMS, tables (schema)is used to access data
5. A "File manager" is
used to store all relationships in directories in File Systems where as a data
base manager (administrator) stores the relationship in form of structural
tables
6. Last.... but not the least....
Data in data bases are more secure compared to data in files!!Hope this thing
is use ful to one and all!! :) :) ;) file system is the method for storing and
organizing computer files and the data they contain to make it easy to find and
access them whereas data base system is a computer software that manages
databases. source: wikipediai also want to know about filebased management
system and databasemanagement system pls tell me plsA computerized database is
stored in a computer and is very fast at organizing information, and grouping
related data. A manual database is like a filing cabinet, slow and clumsy, and
you can lose records down the back. Data can only be found quickly on one bit
of data, for example 'Name' as that will be the only bit visible in the filing
cabinet - to find anything else you need to manual go through each and every
file in the cabinet. File system is a system , that collecting a data or files
and stored in physical location like hard disk or cd-rom. And datadase system
is an integrated logically-realted-data or records in a common pool from where
, multiple users could fetch the data.File systems are containers of
collections. Collections are commonly called directories, and they contains a
set of data units commonly called files. All database architectures provide
structures and methods to organise data (called rows) into collections (called
Tables) that can be updated. Databases have the ability to commit a set of data
changes as one logical unit, and have many users doing this concurrently. The
main difference is that filesystems are the layer underneath a database. The
database system is an application and a set of database files. The database
files are part of the file system container.
Database Management System.
1, A database is an integrated collection of
logically related records or files consolidated into a common pool that
provides data for one or multiple uses. A file is a package of information with
a name attached to it.
2, Databases are basically meant to fragment
data into relations store then so that conditioned retrieval is fast and easy.
A file is just for mas storage for future use. Here the conditioned retrieval
is not a significant factor.
3, To handle small data sets, file is more
efficient than database; that is, consider the stats below, Test done in a
machine (single PC) Test without condition! Test with condition where names
start with 'A'! File operation was faster Database operation was faster (I am
not including the actual time measured ) For simple operations, read, wright,
file operations are faster and simple. But the area where database is of real
use is when there is a conditional retrieval of data.
4, Database is real gift in area's
where we need to have bulk data (including multimedia) and which includes
conditional retrieval. For file operations there are very very tedious
operations which involves large processing time.
T5.3 Explain the main objects of
Access Database.
The parts of an Access database
The following sections are
short descriptions of the parts of a typical Access database. To learn more about
each part, follow the links in the See
Also section of this article.
Tables
A database table is similar in appearance to a spreadsheet, in that
data is stored in rows and columns. As a result, it is usually quite easy to
import a spreadsheet into a database table. The main difference between storing
your data in a spreadsheet and storing it in a database is in how the data is
organized.
To get the most flexibility out
of a database, the data needs to be organized into tables so that redundancies
don't occur. For example, if you're storing information about employees, each
employee should only need to be entered once in a table that is set up just to
hold employee data. Data about products will be stored in its own table, and
data about branch offices will be stored in another table. This process is
called normalization.
Forms
Forms allow you to create a user interface in which you can enter and
edit your data. Forms often contain command buttons and other controls that
perform various tasks. You can create a database without using forms by simply
editing your data in the table datasheets. However, most database users prefer
to use forms for viewing, entering, and editing data in the tables.
You can program command buttons
to determine which data appears on the form, open other forms or reports, or
perform a variety of other tasks. For example, you might have a form named
"Customer Form" in which you work with customer data. The customer
form might have a button which opens an order form where you can enter a new
order for that customer.
Reports
Reports are what you use to format, summarize and present data. A
report usually answers a specific question, such as "How much money did we
receive from each customer this year?" or "What cities are our
customers located in?" Each report can be formatted to present the
information in the most readable way possible.
A report can be run at any
time, and will always reflect the current data in the database. Reports are
generally formatted to be printed out, but they can also be viewed on the
screen, exported to another program, or sent as an attachment to an e-mail
message.
Queries
Queries can perform many different functions in a database. Their
most common function is to retrieve specific data from the tables. The data you
want to see is usually spread across several tables, and queries allow you to
view it in a single datasheet. Also, since you usually don't want to see all
the records at once, queries let you add criteria to "filter" the data
down to just the records you want.
Certain queries are
"updateable," meaning you can edit the data in the underlying tables
via the query datasheet. If you are working in an updateable query, remember
that your changes are actually being made in the tables, not just in the query
datasheet.
Queries come in two basic
varieties: select queries and action queries. A select query simply retrieves
the data and makes it available for use. You can view the results of the query
on the screen, print it out, or copy it to the clipboard. Or, you can use the
output of the query as the record source for a form or repor
Macros
Macros in Access can be thought of as a simplified programming
language which you can use to add functionality to your database. For example,
you can attach a macro to a command button on a form so that the macro runs
whenever the button is clicked. Macros contain actions that perform tasks, such
as opening a report, running a query, or closing the database. Most database
operations that you do manually can be automated by using macros, so they can
be great time-saving devices.
Modules
Modules, like macros, are objects you can use to add functionality to
your database. Whereas you create macros in Access by choosing from a list of
macro actions, you write modules in the Visual Basic for Applications
(VBA) programming language. A
module is a collection of declarations, statements, and procedures that are
stored together as a unit. A module can be either a class module or a standard
module. Class modules are attached to forms or reports, and usually contain
procedures that are specific to the form or report they're attached to.
Standard modules contain general procedures that aren't associated with any
other object. Standard modules are listed under Modules in the Navigation Pane, whereas class
modules are not.
T5.4 Explain the importance of create relationship between
tables
A hefty part of designing a
relational database is dividing the data elements into related tables. Once
you're ready to start working with the data, you rely on relationships between
the tables to pull the data together in meaningful ways. For instance, order
information is useless unless you know
which customer placed a particular order. By now, you probably realize that you
don'tstore customer and order
information in the same table. Instead, you store order and customer
data in two related tables and then use a
relationship between the two tables to view each order and its corresponding
customer information at the same time. If normalized tables are a relational
database's foundation, then relationships are the cornerstone.
Starting
point
The following data is used for demonstration in this article. The process of
normalizing the data through Boyce-Codd Normal Form (BCNF) produced seven
related tables:
Books: {Title*, ISBN, Price}
Authors: {FirstName*, LastName*}
ZIPCodes: {ZIPCode*}
Categories: {Category*, Description}
Publishers: {Publisher*}
States: {State*}
Cities: {City*}
Now it's time to establish just how those tables are related to one another.
Relationship types
You share many relationships with members of your family. For instance, you and
your mother are related. You have only one mother, but she may have several
children. You and your siblings are related—you may have many brothers
and sisters and, of course, they'll have
many brothers and sisters as well. If you're married, both you and your spouse
have a spouse—each other—but only one at a time. Database relationships are
very similar in that they're associations between tables. There are three types
of relationships:
·
One-to-one: Both tables can have only one record on
either side of the relationship. Each primary key value relates to only one (or
no) record in the related table. They're like spouses—you may or may not be
married, but if you are, both you and your spouse have only one spouse. Most
one-to-one relationships are forced by business rules and don't flow
naturally from the data. In the absence of such a rule, you can usually combine
both tables into one table without breaking any normalization rules.
·
One-to-many: The primary key table contains only one
record that relates to none, one, or many records in the related table. This
relationship is similar to the one between you and a parent. You have only one
mother, but your mother may have several children.
·
Many-to-many: Each record in both tables can relate to
any number of records (or no records) in the other table. For instance, if you
have several siblings, so do your siblings (have many siblings). Many-to-many
relationships require a third table, known as an associate or linking table,
because relational systems can't directly accommodate the relationship.
Establishing
relationships
By the time you get around to establishing relationships between the related
tables, you'll probably be very familiar with the data. Consequently,
associations are more obvious at this point than when you started. Your database
system relies on matching values found in
both tables to form relationships. When a match is found, the system pulls the
data from both tables to create a virtual record. For instance, you might want
to see all the books written by a particular author. In this case, the system
would match values between the Books and the Authors tables. It's important to
remember that most of the time, the resulting record is dynamic, which means
any change made to the virtual record will usually work its way back to the
underlying table.
Those matching values are the primary and foreign key values. (The relational
model doesn't require that a relationship be based on a primary key. You can
use any candidate key in the table, but using the primary key is the accepted
standard.) You learned about primary keys in Part 2—a primary key uniquely
identifies each record in a table. A foreign
key is, simply put, one table's
primary key in another table. As such, there's not much for you to do—simply
add the primary key field to
the related table, as a foreign key.
The only consideration is that a foreign key field must be of the same data
type as the primary key. Some systems allow one exception to this rule and will
allow a relationship between a number and an autonumbering field (such as
AutoNumber in Access of Identity in SQL Server). In addition, foreign key values can be Null,
although the recommendation is that you not leave a foreign key Null without a
very specific reason to do so. Chances are you may never work with a database
that requires this capability.
·
Books are related to categories.
·
Books are related to publishers.
·
Books are related to authors.
·
Authors are related to ZIP codes.
·
ZIP codes are related to cities.
·
Cities are related to states.
This particular step isn't written in stone, and you may find it easier to add
foreign keys during the normalization process. When you move a field to a new table, you'll probably add that new table's primary key to
the original table as a foreign key. However, often the foreign keys change as
you continue to normalize the remaining data. You may find it more efficient to
do them all at once after all the tables are completely normalized.
Let's work through each of the tables one at a time, beginning with the Books
table, which at this point has just three fields. Specifically, add the primary
keys from the Authors, Categories, and Publishers tables to Books. When you've
finished, the Books table has seven fields:
Books
Title (PK)
ISBN (PK)
Price
FirstNameFK (FK)
Authors.FirstName many-to-many
LastNameFK (FK)
Authors.LastName
many-to-many
CategoryFK (FK)
Categories.Category many-to-many
PublisherFK (FK)
Publishers.Publisher one-to-many
Remember, the primary key in the Authors table is a complex key based on both
the first and last name fields. Therefore, you must add both fields to the
Books table. Notice that the foreign key field names include a FK suffix.
Adding the suffix improves readability and is self-documenting. You may find it
easier to track foreign keys if you identify them this way in their name. It's
all right if the primary and foreign keys don't have the same name.
There are three relationships present: Books to Authors, Books to Categories,
and Books to Publishers. What might not be as apparent to you are the problems
with two of these relationships:
·
Books to Authors: A book can have more than one author.
·
Books to Categories: A book can have more than one
category.
These two relationships represent many-to-many relationships. Earlier, we told
you that tables can't directly accommodate these relationships and require a
third linking table. (The Books to Publishers relationship is a one-to-many and
is fine just as it's currently stated.)
Both of the newly discovered many-to-many relationships will require a linking
table that contains the primary key from each table, as a foreign key. The new
linking tables are:
|
Figure
A
|
|
|
|
The
original table now requires nine tables.
|
As a result of the sample's simplicity, you
might be wondering just how this relational business helps. It seems that
you're still storing redundant data, just differently—in the form of foreign
keys. That's because our tables have only a few fields right now. Try to
imagine a table with a dozen fields. Granted, you still have to store that
table's primary key as a foreign key value in a related table, but that
probably constitutes one or two extra fields at most. Compare that to the
alternative of adding all dozen entries in that table for every record.
T5.5
Assume that you are creating a database table to hold the information of the
Items in the Super market. Write down the dada type suitable to hold the
following information:
a) Item Number - Number
b) Item Description - Text
c) Unit Price - Currency
d) Stock Balance - Number
e) Reorder Level - Number
f) Store Location – Text
T5.6
Name a suitable field as the primary key in the above table and explain
why you selected this field for the primary key
By definition, a relational database
must contain normalized tables, and to be properly normalized, a table must
contain a primary key. Database developers often disagree about whether it’s
better to use naturally occurring data or meaningless values as a table’s
primary key. Technically, there is no right or wrong to this debate—only very
strong opinions. We strongly support the creation of primary keys from
meaningless values, which we’ll refer to as surrogate keys. In this article, we
discuss the strengths of surrogate keys and the inherent weaknesses of natural
keys.
Primary key defined
Before we enter the debate, we define the term primary key. A primary key uniquely identifies each
record within a table, but that’s only half the story. The main purpose of a
primary key is to relate records to additional data stored in other tables. In
this sense, the primary key is a simple pointer between related records in
different tables. As such, the primary-key value has no meaning to the user and
no association to the data to which it’s assigned.
The developer must apply a few rules when
choosing a primary key for each table:
·
The primary
key must uniquely identify each record.
·
A record’s
primary-key value can’t be null.
·
The primary
key-value must exist when the record is created.
·
The primary
key must remain stable—you can’t change the primary-key field(s).
·
The primary
key must be compact and contain the fewest possible attributes.
·
The
primary-key value can’t be changed.
TASK06
T6.1 How do you add a new e-mail account in
MS Outlook 2007
This tutorial
will guide you through the setup of your email account. You will need the
details we provided you to setup your account on Outlook
- Startup
Microsoft Outlook 2007.(a) If this is the first account you are
setting up on outlook a Wizard will startup, click Next.
On the account Configuration Select yes to configure E-mail account then click Next. Go to to step 2
(b) if you already have an account setup and would like to add another e-mail account.
Select Tools on the Menu Bar then Account Settings.
Select New.
- Select
Microsoft Exchange,POP3, IMAP, or HTTP then click Next
- Enter E-mail account detailsType your name: e.g. Joe BlogsType your E-mail address: e.g. joe@demo.co.lkType your Password: e.g. passwordThen retype your password: e.g. passwordThen Select Manually Configure Server Settings or additional Server types then click Next
- Choose
E-mail Service
Select Internet E-mail then click Next
- Enter Server InformationAccount type: POP3Incoming Mail Server : Information provided by DatadialOutgoing Mail Server(SMTP): Information provided by DatadialUser Name: Information provided by DatadialPassword: Information provided by DatadialSelect Remember password then click More settings
- Outgoing Server SetupSelect Outgoing Server tabSelect my outgoing Server (SMTP) requires authentication and Use same settings as my incoming server then click OK
Select Test Account Settings and check if everything is completed
then select Next
- Finish SetupSelect Finish. If you still have an account settings window open you can click close to return to Outlook
Above is Outlook mail
6.2
What are the configuration required for Outlook to manage multiple e-mail accounts
Whenever
you launch Microsoft
Outlook 2007 for the first time, it will prompt you to configure an email
account if not already done. Before we take a look at configuring an account,
we will explore different types of email accounts that you can configure.
Microsoft Outlook supports Microsoft Exchange, POP3, IMAP and some
HTTP email accounts. To set up your account manually, you need to gather
configuration information from your ISP. But for most accounts Microsoft
Outlook automatically detects and configures the email account as soon as you
enter your email address and password. For Microsoft Exchange users Outlook
automatically identifies your network credentials.
What is a profile?
A profile consists of accounts, settings and data files that
contain information about your emails. A profile is created for you when you
run Microsoft Outlook 2007 for the first time and the same profile runs every
time you start Outlook. Though you can create multiple profiles and choose
which profile you want to logon with. This is a handy feature, when you need to
access multiple email accounts or when many users use the same computer. We
will see how to create multiple profiles later in this article.
You can also add multiple email accounts to one Outlook profile.
For instance you can configure an Exchange account, an HTTP account and so on.
Though there is no limit on how many email accounts a profile can contain, any
single profile can contain only one Microsoft Exchange account.
I. To add an account to Outlook for the first time.
1. Start
> Microsoft Outlook 2007 or double click on the shortcut installed on your
desktop.
2. When
you run Microsoft Outlook 2007 for the first time, Outlook will display a
Welcome screen. The Startup wizard will let you configure an e-mail account.
3. Click
Next to move to the ‘Add New E-mail Account’ window.
4. Enter
your Name, E-mail address (along with the domain name) Password and Retype
Password. Check the box for ‘Manually configure server settings or additional
server types’ if you would like to configure your e-mail account manually. Else
click on Next.
NOTE: Next
button will be activated only when you fill in the account information.
5. Microsoft
Outlook 2007 will then automatically configure e-mail server settings.
6. When
you get a message that says your e-mail account is successfully configured
(shown above), click on Finish to launch Microsoft Outlook 2007. Outlook will
take a couple of minutes to update all your e-mails. If not automatically done,
click on the Send/Receive button on the ribbon or go to Tools > Send/Receive
> Send/Receive All.
NOTE: If
Outlook is unable to configure your account automatically, click on Back and
choose to configure it manually.
7. Your
account is now completely set up.
II. To add another account to a new profile.
1. Close
your Outlook session.
2. Open
Control Panel, double click on Mail. The Mail icon in the control panel will
only be active if you have installed Microsoft Outlook and have accessed it at
least once.
3. Click
on ‘Show Profiles’.
4. In
the Mail window, click Add.
5. You
would then be prompted with the ‘New Profile’ dialog box shown below.
6. Then
follow step 3 onwards given under topic ‘I. To add an account to Outlook
for the first time.’
NOTE: You
can follow these steps to create multiple profiles in Microsoft Outlook 2007
III. To add an account to currently open profile
1. Go
to Tools > Account Settings.
2. Click
on ‘New’ and Outlook will prompt the ‘Add New E-mail Account’ window.
2. Choose
the type of account you want to configure. Then follow step 4 onwards given
under topic ‘I. To add an account to Outlook for the first time.’
IV. To add another account to an existing profile.
1. Close
Outlook session.
2. Open
Control Panel, double click on Mail. The Mail icon in the control panel will
only be active if you have installed Microsoft Outlook and have accessed it at
least once.
3. Click
on ‘Show Profiles’.
4. In
the ‘Mail’ dialog box, choose the profile in which you want to add another
e-mail account and click on Properties. Outlook will now prompt the ‘Mail
Setup’ window as shown below.
5. Click
on ‘E-mail Accounts’ to open the ‘Accounts Settings’ window.
6. Choose
’New’ and in the ‘Add E-mail Account window’ choose the type of account you
want to configure. Then follow step 4 onwards given under topic ‘I. To add
an account to Outlook for the first time.’
T6.3 Write down the steps to search
particular subject in email.
1.
Use
a subject line that matters – If you want
your recipient to read your email and take action, then give him a reason to
open it. When an email arrives without a subject, it might be considered a
virus or otherwise it will almost surely be considered unimportant. Use a
pertinent subject line that tells your recipient why you’re writing to him.
That way, he can prioritise how he opens his emails and might just open yours
sooner rather than later.
2.
Stop
simply hitting ‘reply’ on old emails – Open up a new
email and use a new subject line! Every time you reply to an old email just so
you can avoid having to enter the recipient’s email address again, you really
just add clutter to their inbox. If you have a fresh topic, then make it clear.
The day you ask your recipient to refer back to an email you sent about a
particular issue, he’ll have a devil of a time finding the exact email or
conversation you’re referring to!
3.
Avoid
keeping the ‘fwd’ element – You may have a
very good reason to forward an email to another person, but considering the
saturation level of forwarded
junk and joke emails,
those three letters – ‘fwd’ – are a trigger for a happy delete button finger.
Simply remove the ‘fwd’ from the subject line and let the recipient know what
they’re receiving.
4.
Remember
that subject lines are searchable – We all use our
search boxes to locate specific emails we need to revisit. Make it easy for
your recipients to search for exactly the email they need and you’ll spare them
an awful lot of frustration.
5.
Don’t
use generic subject lines – A subject line
that says ‘hi’ or ‘email’ has no value whatsoever.
6.
Use
specific information when sending stock standard emails – If an
architect uses the words ‘site visit’ in every single email he sends about
appointments to various building sites around town, how can anyone ever narrow
those emails down to particular sites? Same goes for graphic designers who
might use ‘latest revisions’ and retailers who type ‘new product order’. Add a
site address, a job type/name or an order number.
7.
Keep
subject lines short – Anything more
than 35 characters could be invisible to your recipient, depending on which
email platform he uses.
8.
Induce
urgency – If your email
is genuinely important, say so in the subject line. Some email platforms enable
viewing panes or make the first couple of lines visible before opening the
email itself. That means we can become complacent about what’s in the email and
avoid opening it, thinking it’s nothing new. But using “Open today –
date-critical information inside” or “Please read asap” are all it takes to
alert the recipient not to overlook the email.
9.
Use
the tools available – Most email
platforms enable you to ‘edit subject line’ before replying to an email you’ve
received. It means you can retain the momentum of the conversation but be very
specific about the content of your latest reply.
10. Don’t use ‘re’ to say ‘about’ – Everyone knows
that ‘re’ means ‘reply’ or ‘response’ but if you start using ‘re’ meaning
‘regarding’, you’ll cause confusion. Your recipient may think they’ve received
a reply to an email they didn’t
write, accompanied by a subject line that’s completely unfamiliar.
T6.4 How do
you create a New Contact and add in group’s list
- In Outlook 2007, go to the File menu, select New,
and select Distribution List.
- A new Distribution List window will open.
- Type the name of your distribution list in the Name
box.
- Click Add Members.
- You will be shown your Contacts or your Global Address
List. To switch between lists, use the Address Book drop down menu in the
tip right corner.
- Double click on the name of every contact you want to
add to your list and click OK.
- To add a someone not in your address book or contact
list, click Add New on the ribbon. Fill in the Display Name
and Email address fields and click OK.
- When you’re finished adding email addresses to your Distribution List/Contact Group, click Save and Close.
TASK07
T7.1 Explain what is user interface
design and the summary of principles for user interface design
The “Principles of user interface design”
are intended to improve the quality of user interface
design.
Layout - the interface should be a
series of areas on the
screen
that are used consistently for
different purposes.
Content Awareness - the user is always aware of where they are in the system and what
information
is being displayed.
Aesthetics - interfaces should look inviting and should be easy to use.
User Experience - experiences users prefer ease of use, while inexperienced users
prefer ease of
learning.
Consistency - users can predict what will happen before a function is performed.
Minimize Effort - interface should be
simple to use
T7.2 What is the use of sitemap of the web site?
A site map is a visual
or textually organized model of a Web site's content that allows the users to
navigate through the site to find the information they are looking for, just as
a traditional geographical map helps people find places they are looking for in
the real world.
A site map is a visual or textually organized model
of a Web site's content that allows the users to navigate through the site to
find the information they are looking for, just as a traditional geographical
map helps people find places they are looking for in the real world. A site map
is a kind of interactive table of contents, in which each listed item links
directly to its counterpart sections of the Web site. Site maps perform the
same service that the layout maps in large shopping malls perform: without
them, it is possible to explore a complex site by trial and error, but if you
want to be sure to find what you're looking for, the most efficient way to do
that is to consult a model of the resources available. If a Web site is small
and uncomplicated, a site map may be unnecessary, just as a layout map may not
be required for shoppers to find their way through small shopping malls.
Importance of Sitemaps
There are many SEO tips and tricks that help in optimizing a site
but one of those, the importance of which is sometimes underestimated is
sitemaps. Sitemaps, as the name implies, are just a map of your site - i.e. on
one single page you show the structure of your site, its sections, the links
between them, etc. Sitemaps make navigating your site easier and having an
updated sitemap on your site is good both for your users and for search
engines. Sitemaps are an important way of communication with search engines.
While in robots.txt you tell search engines which parts of your site to exclude
from indexing, in your site map you tell search engines where you'd like them
to go.
Typically, site maps are organized hierarchically, breaking
down the Web site's information into increasingly specific subject areas. There
are a number of different types of site maps: organizational
chart site maps are quite
similar in appearance to a traditional table of contents; others, based on a
perspective view of the site, are like a three dimensional model with
individual pages upright, like index cards, arranged in sections and linked by
lines. Structured Graph Format (SGF) site maps use an XML format language to describe Web site content, and a Java SGF viewer to interact with the data. There are a number of
companies making site mapping products; generally, these don't require Web
design skills - such as HTML or XML ability - on the part of the user. Popular
site mapping products include TheBrain's SiteBrain, Inxight Software's Tree
Studio, IBM's Java-based Mappuccino, and Dynamic Diagram's eponymous product.
Site maps can also be created using more general Web site management tools,
such as Visual Web, or Microsoft's Site Analyst.
Why Use a
Sitemap
Using sitemaps has many benefits, not only easier
navigation and better visibility by search engines. Sitemaps offer the
opportunity to inform search engines immediately about any changes on your
site. Of course, you cannot expect that search engines will rush right away to
index your changed pages but certainly the changes will be indexed faster,
compared to when you don't have a sitemap.
Also, when you have a sitemap and submit it to
the search engines, you rely less on external links that will bring search
engines to your site. Sitemaps can even help with messy internal links - for
instance if you by accident have broken internal links or orphaned pages that
cannot be reached in other way (though there is no doubt that it is much better
to fix your errors than rely on a sitemap).
A good
site map does the following:
·
Shows a quick,
easy-to-follow overview of your site.
·
Provides a pathway
for the search engine robots to follow.
·
Provides text links
to every page of your site.
·
Quickly shows
visitors how to get where they need to go.
Site maps are very important for two
main reasons. First, your site map provides food for the search engine spiders
that crawl your site. The site map gives the spider links to all the major
pages of your site, allowing every page included on your site map to be indexed
by the spider. This is a very good thing! Having all of your major pages
included in the search engine database makes your site more likely to come up
in the search engine results when a user performs a query. Your site map pushes
the search engine toward the individual pages of your site instead of making
them hunt around for links. A well-planned site map can ensure your Web site is
fully indexed by search engines.
T7.3 Use a template
to create a webpage using tables to organize the Title, Links, and Context
User Interface Design means the design of computers,
software applications, websites etc. with the focus on the user’s interaction
and experience. It aims to enhance the visual, technological and usability
quantities of an interface. The principals for user interface design are the
structure, the visibility, the simplicity, the feedback, the tolerance and the
reuse
T7.2 What is the use of sitemap of the web site?
A site map is a visual or textually organized model of a Web site's content
that allows the users to navigate through the site to find the information they
are looking for, just as a traditional geographical map helps people find
places they are looking for in the real world. A site map is a kind of
interactive table of contents, in which each listed item links directly to its
counterpart sections of the Web site. Site maps perform the same service that
the layout maps in large shopping malls perform: without them, it is possible
to explore a complex site by trial and error, but if you want to be sure to
find what you're looking for, the most efficient way to do that is to consult a
model of the resources available. If a Web site is small and uncomplicated, a
site map may be unnecessary, just as a layout map may not be required for
shoppers to find their way through small shopping malls.
There are two types of sitemaps,
v
HTML ( Hyper Text
Markup Language – type )
An HTML sitemap is a graphical presentation that displays hierarchically
grouped, lists of hyperlinks belonging to all the pages of a website. It's
primarily designed for humans.
By adding an HTML sitemap in your website, site visitors can easily navigate
through the website. Additionally, a sitemap of this sort helps in - Sitemap
based SEO - because it allows search engine spiders to easily find all the
hyperlinks to every page on the website thus avoiding - missed pages.
Missed pages simply mean that these pages will not be in the search engine’s
index. Therefore these pages never show up for those who use search engines ( like
Google, Bing and Yahoo ) to locate appropriate pages for them to visit.
v
XML ( eXtensible Markup
Language - type).
An XML sitemap, is basically a list of the different URLs of a website but
the list is created using very specific syntax ( i.e. XML ) that all
search engines spiders are trained to understand with ease.
Using an XML site map for – Sitemap based SEO - accelerates search engine
indexing because an XML site map informs search engine spiders about the
different URLs of the website in a language they understand.
Most search engine spiders are trained to look for and identify if an XML
based site map exists on a website. If it does its accessed and used
immediately by the spider.
A search engine’s spider does not have to visit each page of the website and
navigate through the links on the page to understand the website’s
architecture. The spider only has to locate XML based site map to see and
understand the entire website architecture.
Hence a
website that uses an XML based site map for – Sitemap based SEO – would be
indexed faster and more accurately and would perhaps rank well in search
engines because the website has been thoroughly checked
T7.3 Use a template to create a webpage
using tables to organize the Title, Links, and Context
<html>
<head>
<font color="white">
<h1 align="center"> welcome to IDM</h1>
</head>
<body>
<body bgcolor="black">
<font color="white">
<p> IDM strted to way back in 1981 and currently enjoying
more than 100 SBU's islandwide.</p>
<h2> Available English Courses</h2>
<UL>
<Li>FCE</Li>
<Li>PET</Li>
<Li>KET</Li>
</UL>
<h2>Available computer courses</h2>
<OL>
<Li>ICDL </Li>
<Li>Dip in ICT </Li>
<Li>DTP</Li>
</OL>
<table border =1>
<tr><td> <colspan=3><font
color="white">course fees</font></td></tr>
<tr><td><font color="white">courses
code></font></td><td><font
color="white">tilte</font></td><td><font
color="white">fee</font></td></tr>
<tr><td><font color="white">0011</td></font><td><font
color="white">FCE</td></font><td></font><font
color="white">20,000</font></td></tr>
<tr><td><font
color="white">0012</td></font><td><font
color="white">PET</td></font><td><font
color="white">15,000</font></td></tr>
<tr><td><font
color="white">0013</td></font><td><font
color="white">KET</td></font><td><font
color="white">12,000</font></td></tr>
</table>
</body>
</html>
TASK08
T8.1 Create a page with a 1 row, 3
column table to hold three pictures of graphics
<html>
<body>
<table>
<tr><td><img
src="D:\photo.jpg"></td><td><img
src="D:\Pictures\Wallpapers\All\23-flame-fantasy01.jpg">1</td><td><img
src="C:\Users\Dell 1\Downloads\Rabbit_hd_laptop_resolution.jpg"></td></tr>
</table>
</body>
</html>
T8.2
List down & briefly explain about some creative things that can be included
in web sites
1. An About Page
Artists, designers, and photographers are
famous for leaving the explanation up to the observer. But a little bit about
you, along with an artist statement, goes a long way in helping viewers and
visitors understand your work and feel connected to it, and you.
While you’re at it, make sure to include
your full name. Lots of people forget this, particularly if their business name
is different from their personal name. Unless you’re working undercover,
remember that people want to know who you are.
2. Your Photo
Chances are, you have beautiful images of
your work on your site, but you don’t even have one single photo of yourself!
We get it. When the lens is turned onto you, you get camera-shy. But when
potential clients are meeting you for the first time online, a self-portrait is
essential to helping make you seem real, human and personal.
The Graph Paper Press About You
Widget is a plugin for
WordPress that adds a widget for easily creating an about you section to any
widgetized region in your theme. On the widget page, you can add your
name, your photo, a brief bio, an email address, a phone number and a web link.
The plugin inherits the styling of your theme. Easy peasy.
3. Contact Info
Yes, we have actually seen people leave
this out! Your business isn’t much of a business if no one can reach you. List
your email and phone number, or if you prefer, link to a contact form. That
said, relying solely on contact forms can prove problematic if either the form
doesn’t send you a notification or your visitors provide an incorrect email.
Either way, don’t make your visitors rely on telepathy to speak to you.
4. Your Location
Location, location, location. The mantra
still holds true online, even if you work or sell your work beyond your local
city or town. It’s good for visitors and potential clients to know where you
work (think time zones, ship times, etc.), and bloggers and reporters often
look at where you are located for their stories.
5. Call to Action
We’ve noticed creatives are shy about
getting people to do anything but enjoy their work. And if that’s your goal, by
all means, keep at it! But if you also want to make a living, think about
leading your visitors to whatever action you want potential customers to take.
Add a “Buy” or “Purchase” page and button, or simply an “Inquire to Buy” link
that leads to your contact information.
To quickly add a call to action, use the
Graph Paper Press Shortcodes plugin,
which gives you the ability to add a button element to your site. Just wrap the
text you want to use (your call to action) in the shortcode [button]. See an
example near the end of this page.
6. Social Buttons
If you have an active Facebook, Twitter,
or other social accounts, make sure not to forget links to your pages and
profiles on your site (just make sure the accounts you link to are updated
regularly!). Let your visitors and clients interact with you where they feel
most comfortable.
Want to make it easy for your readers to
share your blog posts on Twitter and Facebook? Follow this tutorial to add social media sharing buttons to
your posts.
You can also add the our Base Hook Widgets plugin to easily add social icons to
whatever area you prefer on your site: before the header, in the header, after
the header, before the title, after the title, before the sidebar, after the
sidebar, before the footer, after the footer… well, you get the idea.
7. Email Collector
You get one shot at keeping people’s
attention when they visit your site. Once visitors leave, they likely won’t
come back, even if they have the best of intentions. Capture their interest
with an opt-in sign-up email form, and email your list on a consistent and
regular basis (no need to stress about it – once a month should be plenty). Incentivize
sign-ups with promotions, deals, sneak peeks and/or an insider’s look at your
work.
Email marketing services that integrate
with WordPress include MailChimp (starts
at Free),Campaign Monitor ($15 a month for small lists), and Constant Contact ($15 a month for small lists). We’ve
personally used both MailChimp and Campaign Monitor and both are great options.
8. An Unsubscribe Link
You hate spam, right? So do your fans.
Before you get too excited about emailing customers and potential clients,
remember that you should never, ever send unsolicited email. Don’t add emails
to your list unless visitors have added themselves, or people you know have
explicitly given you permission. And make sure to add an unsubscribe link in
case people change their minds. It’s the law, not to mention you only want to
be emailing individuals who are truly inspired by your work.
9. Testimonials
If people say nice things about you, other
people should know. Testimonials add social proof and help increase sales of
your services and work. After all, what others say about you is 10X more
powerful and persuasive than what you say about yourself. Consider integrating
testimonials into key areas all around your site.
10. Your Personality
Okay, this one is a bit tougher than all
the rest, but is obviously the most essential. Your site is your personal space
on the web – you own it. Don’t be afraid to make your mark. Don’t copy what
everyone else is doing. Do you.
T8.3 List down &
briefly explain what things that has to be avoided when designing web pages
1. The user must know what the
site is about in seconds: attention is one the most valuable
currencies on the Internet. If a visitor can not figure what your site is about
in a couple of seconds, he will probably just go somewhere else. Your site must
communicate why I should spend my time there, and FAST!
2. Make the content
scannable: this is the Internet, not a book, so forget large blocks of
text. Probably I will be visiting your site while I work on other stuff so make
sure that I can scan through the entire content. Bullet points, headers,
subheaders, lists. Anything that will help the reader filter what he is looking
for.
3. Do not use fancy fonts that
are unreadable: sure there are some fonts that will give a
sophisticated look to your website. But are they readable? If your main
objective is to deliver a message and get the visitors reading your stuff, then
you should make the process comfortable for them.
4. Do not use tiny fonts:
the previous point applies here, you want to make sure that readers are
comfortable reading your content. My Firefox does have a zooming feature, but
if I need to use on your website it will probably be the last time I visit it.
5. Do not open new browser
windows: I used to do that on my first websites. The logic was simple,
if I open new browser windows for external links the user will never leave my
site. WRONG! Let the user control where he wants the links to open. There is a
reason why browsers have a huge “Back” button. Do not worry about sending the
visitor to another website, he will get back if he wants to (even porn sites
are starting to get conscious regarding this point lately…).
6. Do not resize the user’s
browser windows: the user should be in control of his browser. If you
resize it you will risk to mess things up on his side, and what is worse you
might lose your credibility in front of him.
7. Do not require a registration
unless it is necessary: lets put this straight, when I browse around
the Internet I want to get information, not the other way around. Do not force
me to register up and leave my email address and other details unless it is
absolutely necessary (i.e. unless what you offer is so good that I will bear
with the registration).
8. Never subscribe the visitor
for something without his consent: do not automatically subscribe a
visitor to newsletters when he registers up on your site. Sending unsolicited
emails around is not the best way to make friends.
9. Do not overuse Flash:
apart from increasing the load time of your website, excessive usage of Flash
might also annoy the visitors. Use it only if you must offer features that are
not supported by static pages.
10. Do
not play music: on the early years of the Internet web developers
always tried to successfully integrate music into websites. Guess what, they
failed miserably. Do not use music, period.
11. If
you MUST play an audio file let the user start it: some situations
might require an audio file. You might need to deliver a speech to the user or
your guided tour might have an audio component. That is fine. Just make sure
that the user is in control, let him push the “Play” button as opposed to
jamming the music on his face right after he enters the website.
12. Do
not clutter your website with badges: first of all, badges of networks
and communities make a site look very unprofessional. Even if we are talking
about awards and recognition badges you should place them on the “About Us”
page.
13. Do
not use a homepage that just launches the “real” website: the smaller
the number of steps required for the user to access your content, the better.
14. Make
sure to include contact details: there is nothing worse than a website
that has no contact details. This is not bad only for the visitors, but also
for yourself. You might lose important feedback along the way.
15. Do
not break the “Back” button: this is a very basic principle of
usability. Do not break the “Back” button under any circumstance. Opening new
browser windows will break it, for instance, and some Javascript links might
also break them.
16. Do
not use blinking text: unless your visitors are coming straight from
1996, that is.
17. Avoid
complex URL structures: a simple, keyword-based URL structure will not
only improve your search engine rankings, but it will also make it easier for
the reader to identify the content of your pages before visiting them.
18. Use
CSS over HTML tables: HTML tables were used to create page layouts.
With the advent of CSS, however, there is no reason to stick to them. CSS is
faster, more reliable and it offers many more features.
19. Make
sure users can search the whole website: there is a reason why search
engines revolutionized the Internet. You probably guessed it, because they make
it very easy to find the information we are looking for. Do not neglect this on
your site.
20. Avoid
“drop down” menus: the user should be able to see all the navigation
options straight way. Using “drop down” menus might confuse things and hide the
information the reader was actually looking for.
21. Use
text navigation: text navigation is not only faster but it is also
more reliable. Some users, for instance, browse the Internet with images turned
off.
22. If
you are linking to PDF files disclose it: ever clicked on a link only
to see your browser freezing while Acrobat Reader launches to open that
(unrequested) PDF file? That is pretty annoying so make sure to explicit links
pointing to PDF files so that users can handle them properly.
23. Do
not confuse the visitor with many versions: avoid confusing the
visitor with too many versions of your website. What bandwidth do I prefer?
56Kbps? 128Kbps? Flash or HTML? Man, just give me the content!
24. Do
not blend advertising inside the content: blending advertising like
Adsense units inside your content might increase your click-through rate on the
short term. Over the long run, however, this will reduce your readership base.
An annoyed visitor is a lost visitor.
25. Use
a simple navigation structure: sometimes less is more. This rule
usually applies to people and choices. Make sure that your website has a
single, clear navigation structure. The last thing you want is to confuse the
reader regarding where he should go to find the information he is looking for.
26. Avoid
“intros”: do not force the user to watch or read something before he
can access to the real content. This is plain annoying, and he will stay only
if what you have to offer is really unique.
27. Do
not use FrontPage: this point extends to other cheap HTML editors.
While they appear to make web design easier, the output will be a poorly
crafted code, incompatible with different browsers and with several bugs.
28. Make
sure your website is cross-browser compatible: not all browsers are
created equal, and not all of them interpret CSS and other languages on the
same way. Like it or not, you will need to make your website compatible with
the most used browsers on the market, else you will lose readers over the long
term.
29. Make
sure to include anchor text on links: I confess I used to do that
mistake until some time ago. It is easier to tell people to “click here”. But
this is not efficient. Make sure to include a relevant anchor text on your
links. It will ensure that the reader knows where he is going to if he clicks
the link, and it will also create SEO benefits for the external site where the
link is pointing.
30. Do
not cloak links: apart from having a clear anchor text, the user must
also be able to see where the link is pointing on the status bar of his
browser. If you cloak your links (either because they are affiliate ones or due
to other reasons) your site will lose credibility.
31. Make
links visible: the visitor should be able to recognize what is
clickable and what is not, easily. Make sure that your links have a contrasting
color (the standard blue color is the optimal most of the times). Possibly also
make them underlined.
32. Do
not underline or color normal text: do not underline normal text
unless absolutely necessary. Just as users need to recognize links easily, they
should not get the idea that something is clickable when in reality it is not.
33. Make
clicked links change color: this point is very important for the
usability of your website. Clicked links that change color help the user to
locate himself more easily around your site, making sure that he will not end
up visiting the same pages unintentionally.
34. Do
not use animated GIFs: unless you have advertising banners that
require animation, avoid animated GIFs. They make a site look unprofessional
and detract the attention from the content.
35. Make
sure to use the ALT and TITLE attributes for images: apart from having
SEO benefits the ALT and TITLE attributes for images will play an important
role for blind users.
36. Do
not use harsh colors: if the user is getting a headache after visiting
your site for 10 consecutive minutes, you probably should pick a better color
scheme. Design the color palette around your objectives (i.e. deliver a mood,
let the user focus on the content, etc.).
37. Do
not use pop ups: this point refers to pop ups of any kind. Even user
requested pop ups are a bad idea given the increasing amount of pop blockers
out there.
38. Avoid
Javascript links: those links execute a small Javascript when the user
clicks on them. Stay away from them since they often create problems for the
user.
39. Include
functional links on your footer: people are used to scrolling down to
the footer of a website if they are not finding a specific information. At the
very least you want to include a link to the Homepage and possibly a link to
the “Contact Us” page.
40. Avoid
long pages: guess what, if the user needs to scroll down forever in
order to read your content he will probably just skip it altogether. If that is
the case with your website make it shorter and improve the navigation
structure.
41. No
horizontal scrolling: while some vertical scrolling is tolerable, the
same can not be said about horizontal scrolling. The most used screen
resolution nowadays is 1024 x 768 pixels, so make sure that your website fits
inside it.
42. No
spelling or grammatical mistakes: this is not a web design mistake,
but it is one of the most important factors affecting the overall quality of a
website. Make sure that your links and texts do not contain spelling or
grammatical mistakes.
43. If
you use CAPTCHA make sure the letters are readable: several sites use
CAPTCHA filters as a method of reducing spam on comments or on registration
forms. There is just one problem with it, most of the times the user needs to
call his whole family to decipher the letters.
.
T8.4 There are many things that need to
be taken into account before you begin to create html documents. List some of
those with brief introductions.
These
tutorials are set up so you can move through them over a week's time. One
tutorial per day. However, if you can go faster, do it! Some have told me that
they finished the primers in a day. Good luck.
1:
Introduction This is a basic
introduction to HTML and covers what you will need to know to begin writing. If
you are reading this, you probably have what you need.
This tutorial introduces you to the placing of HTML tags so you can begin to
manipulate text.
Learn how to use tags to make text bigger, smaller, or act as a header for your
WWW pages.
This is the hallmark of HTML. Learn how to make a link from your page to any
other page on the World Wide Web.
Learn how to place images on your page, get text to wrap around them, and how
to use them as links to other pages.
Here you'll be shown how to make images bigger or smaller using HTML commands.
Here you'll get your diploma, along with some
hints on choosing an Internet Service Provider and choosing an HTML Assistant,
if you care to use one.
End of
eassighment


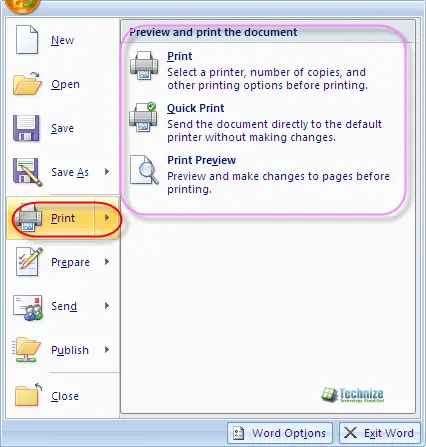
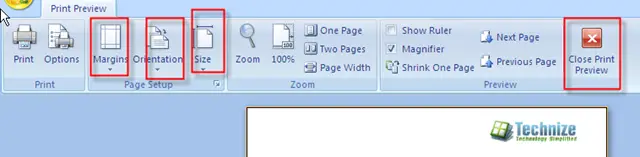
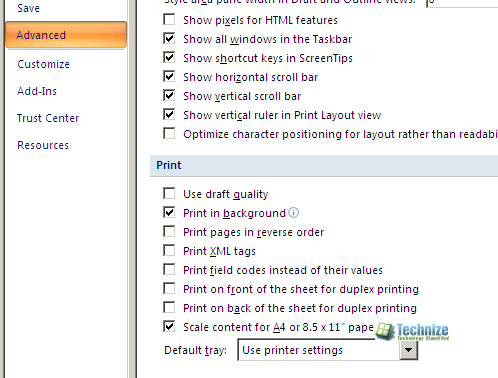
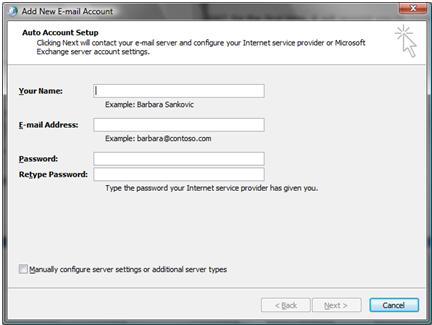
GOOD ASSIGNMENT
ReplyDelete👍👍👍👍